Commercial FAQ
Can I get a free trial ?
- If you're not sure if our product is right for you, we offer a two-week 100% money-back guarantee.
- We also have a live demo site with all modules enabled, so you can test out for example the HTML module and also upload your own templates.
- If you need more information, we can arrange a free video call to help you find out what you need. Click here to book the call.
What is the LICENSE ?
You can download the license file for docxtemplater PRO, docxtemplater ENTREPRISE or a single docxtemplater Module here.
How do I get the modules ?
Right after your payment (within 5 minutes), you should receive an email with urls that allow you to do
npm install --save <secret-url>
Each of the version of each modules has a unique URL, so that you can point to one specific version so that nothing will break if you did not intend to upgrade.
Can I get a Promotional Code / Discount ?
I do not offer discount codes. The price is the same for everyone.
Can I still use the software next year if I stop paying ?
No. The docxtemplater PRO plan / ENTREPRISE plan / SINGLE MODULE plan / are for a duration of 1 running year at the time of the payment (from 16th August 2017 to 16th August 2018 for example). It allows to run the software in production for that period of time, and gives you access to all updates and support.
It costs 1250 euros for one year. It cannot be canceled during the year, only after the end of the period.
If you stop using the modules, you don't have to pay anymore.
Whenever you subscribe to docxtemplater pro, you will get a unique URL that allows you to do npm install <secret-url> to install each of the modules. If after one year, you do not renew, the url expires and you won't have access to the package anymore.
Here are a few examples of what is possible :
Company Acme buys the PRO module on 16th August 2017 and pays 1250 euros. After one year, they decide they don't need the module anymore, and the URL expires on 16th August 2018.
Company Acme buys the PRO module on 16th August 2017 and pays 1250 euros. After 9 months they do not need to use the modules anymore. They don't get money back, the subscriptions are for one year.
Company Acme buys the PRO module on 16th August 2017 and pays 1250 euros. After one year, they wish to continue using the modules, and pay the renewal at 1250 euros per year.
Can I use the license for SaaS ?
Yes, the license model is suitable for Software as a Service businesses. As long as you are the entity running docxtemplater software, you can use the normal licenses.
You are however not allowed to install the PRO/ENTREPRISE or docxtemplater modules software on-site on your clients servers.
After I bought the modules, can I get some technical support ?
Yes, if you have any issues with docxtemplater (open-source) or one of the modules, I will give you support without additional charges.
To have faster answers, please include the used modules, the template document, your JSON data, and code.
Can I resell your software ?
Resellers can buy docxtemplater modules, the PRO,ENTREPRISE, or PREMIUM docxtemplater version on behalf of their customers. They must provide a distinct email address for each customer and be able to pay via credit card or invoice with no manual process on our part. We will not allow resellers who require annual handholding or manual processing.
As a reseller, you use a different email for each customer of yours, and you are allowed to transfer the access links to your customers. Please then send us an email to tell us who the customer is so that we know whom we should provide support to.
We do not offer discount to resellers.
Can I redistribute docxtemplater-pro or entreprise to my customers ?
This is a common requirement for the "appliance" model, where you install you sell software to other companies. The standard license does not allow to redistribute the software.
The Appliance license plan costs :
- 6000€ per year for the PRO feature set (choose 4 modules)
- 12000€ per year for the ENTREPRISE feature set version
- 2500€ per year for a single module license.
All Appliance licenses also get priority email support, with average response time of 24 hours.
It allows you to distribute the modules contained in the PRO or ENTREPRISE module as part of your application. You are not allowed to resell the modules as is.
This method of distribution is also sometimes called on premise.
Can I upgrade from the PRO plan to the ENTREPRISE plan, or from a single module to the PRO plan?
Yes, absolutely — upgrading is straightforward, and you won’t pay twice for what you already purchased.
You can upgrade:
- From the PRO plan to the ENTREPRISE or PREMIUM plan.
- From a single module to a plan that includes that module (e.g., from the image-module to the PRO plan).
Note: It is not possible to switch from one individual module to another (e.g., from image-module to html-module).
How to upgrade
Simply contact me, and I will send you an invoice that reflects a credit for the unused portion of your current plan.
Upgrade Example
On September 1st, 2023, the Acme Company purchases the PRO Plan for one year at 1250€. On December 1st, 2023, they decide to upgrade to the ENTREPRISE Plan, which costs 3000€ per year.
In this case, the new plan would run until December 1st, 2024, and Acme would receive a credit for the unused portion of the PRO plan — that is, for the 273 days between December 1st, 2023, and September 1st, 2024.
Since 273 days represent roughly 75% of the year, Acme receives a credit of 938€ (75% of 1250€). Therefore, they only need to pay the difference: 3000€ – 938€ = 2062€ for the upgrade. After the upgrade, the license will be valid up to December 1st 2024 (exactly 1 year after the upgrade).
What are the usage limits ?
Indeed, there are some limitations in terms of usage.
It all depends on your usage. You have 3 ways of using docxtemplater :
- server-side : your own server (AWS EC2, a virtual machine somewhere)
- client-side : the code runs in the end-user's web browser (Firefox, Chrome, …)
- serverless : AWS Lambda, Google Cloud Serverless, Azure Functions
In each case, you have 5 Instances for a normal license.
You can see just below what an Instance means in each of the 3 above context.
What exactly is an Instance when using docxtemplater server-side ?
In the license terms, it is specified that you cannot exceed the maximum number of Instances authorized at the time of purchase. The ENTREPRISE and PRO plan, as well as the single module plans, each include a limit of max 5 Instances (except if specified otherwise in your invoice).
By the word "Instance", we mean the number of CPUs that are running docxtemplater-pro or docxtemplater-entreprise software. For example, if you use 4 servers in production that have the pro software installed, and they run the software on only one CPU each (if you run the software on multiple processes for each server, each process counts as one Instance), the quota of used instances will be of 4 out of 5 which is the maximum limit for that license.
Development and testing instances do not count, you can use as many instances as you need on non-production instances.
If you need more than 5 Instances, please contact us (email is in the footer).
What exactly is an Instance when using docxtemplater client-side ?
When you use docxtemplater client side, Instances are not the number of CPUs, but each user (real life person) that has access to docx generation in your application is counted as 0.005 Instance, which means if you buy the PRO license giving you a limit of 5 Instances, you are allowed to have a maximum of 1000 users with access to the features given by docxtemplater Modules.
Development and testing instances do not count, you can use as many instances as you need on non-production instances.
How to count Instances on serverless instances
When using serverless providers (such as AWS Lambda), the instance count is different than when running docxtemplater on a traditional server.
In that case, you are allowed to call the docxtemplater rendering engine up to 50 times the number of Instances you have per hour.
For example, if your license gives you 5 instances, you can run the given lambda up to 250 times per hour. ie run 250 lambdas per hour that will use the docxtemplater modules that you've purchased.
Can I buy a perpetual license of docxtemplater ?
Yes, there is an option to buy a perpetual license, which allows you to install the software on new hosts perpetually.
The pricing for the Entreprise feature set for this model is 12250€ one time. We will in this case also give you support for a duration of 3 years.
The max instance count of 5 Instances still applies.
Can you send me a quote or an invoice ?
Yes, you can get a quote for the entreprise license (at 3000€/year) :
You will then have to send approval via a PO or simple email.
Can I pay for the software by wire transfer ?
We accept payment by wire transfer only if you buy the docxtemplater ENTREPRISE Plan (at 3000€ per year) or if the amount is higher than 1500€ per year.
We accept IBAN (European bank transfers), and if you want to do a bank transfer from outside the EU, you will have to pay any additional fees.
To request a quote for the ENTREPRISE Plan, use following page.
Can I pay monthly or quarterly instead of yearly ?
The docxtemplater modules are bought on a yearly basis, no exceptions.
What support do you offer ?
For the support, it includes a response usually in less than a business day to each question regarding :
- the usage of a module that you've access to
- the usage of the main docxtemplater library
- fixing bugs where a template results in an error that is not correctly handled by the library
- providing help to achieve one of your goal in generating documents
- fixing performance issues
- adding small features (that are done on my side in less than 4 hours), that make sense in generalfor other users of docxtemplater or of the paid modules
It does not include development of new features that take over 4 hours of work, or that are not generic enough to be used by other users of docxtemplater.
Canceling the subscription
You can cancel the subscription at any time by simply sending an email to us (see Contact us button at the bottom of this page).
After cancelation, your credit card will no more be charged, and after your subscription period ends, you will no more be allowed to install the docxtemplater modules on any new servers. You will also get access to all updates and support.
Docxtemplater PRO-legacy
If you purchased docxtemplater PRO before May 2023, you are using the PRO-LEGACY license which gave you access to the following modules : image, html, slides, subtemplate, word-run and footnotes module. This plan costs 950€.
The new PRO plan (also called PRO-SELECT), available since June 2023, gives you access to 4 modules you select for the price of 1250€.
If you're using the PRO-LEGACY plan, you can ask us to upgrade to the new plan by contacting us.
You can also choose to keep the PRO-LEGACY license if you prefer, and continue to pay 950€/year.
The PRO-LEGACY plan is not available to new customers.
Requesting a refund
During the two weeks following your purchase, you are allowed to ask for a 100% refund. In that case, you will no longer be allowed to use the software.
To request a refund, send us an email with your account information.
Legal Information
The legal information for the company publishing docxtemplater.com and its modules is :
- Company Name: Coding Puffin SAS
- VAT NUMBER: FR60890806888
- SIRET Number: 89080688800016
- Company Address: 6 rue Jean Zay, 91300 Massy, France
If you need a contact email, for all purposes (marketing, legal, tech support, …), please use the email shown when you click "contact us" at the bottom of the page.
My bank information details can be found on the invoices that I will be sending you.
Technical FAQ
How do I get started with a module ?
After you have bought a license, you will get an email with commands to install each module you have access to.
How are the modules packaged ?
The modules are installed via npm, you'll have to run :
npm install --save <secret-url>
where secret-url is a url that will be unique for your account.
The files required to run in the browser are also bundled inside the package.
How can I use a module in the browser ?
All modules can be used in the browser (for example, it is possible for the image module, slides module, html module, …), you can use the file present in the build directory of your module. That is for example, in the case of the html module :
node_modules/docxtemplater-html-module/build/html-module.min.js
How can I know when new releases come out ?
All modules have an RSS Feed available at this link :
https://docxtemplater.com/modules/<module>/releases.rss
For example :
How are the modules tested ?
All modules are tested with integration tests (using real docx, pptx or xlsx documents), and cannot be published without the tests passing. The tests can be run by running npm test.
Where is the issue tracker ?
Here is the public github issue tracker.
It is also possible to contact us via email (on the bottom of this page), for questions with undisclosable files, or questions about sales.
Is it possible to generate a Table of Contents ?
This is a limitation of a templating engine. docxtemplater is not a rendering engine. Having a proper docx rendering engine running in NodeJS would require an enormous amount of work (basically the same amount of work that went to Microsoft Word). Since docxtemplater does not know how to render a docx document, (which determines the page numbers), this is why it is impossible to regenerate the page numbers within docxtemplater. A solution would be to look for a tool or script that can communicate with Word and regenerate the Table of Contents.
How can I update my modules ?
As long as you have an active subscription, you can download all latest docxtemplater modules.
You can upgrade your package.json automatically to upgrade all modules you are using and docxtemplater itself by using following command :
npm install docxtemplater && npx -y update-docxtemplater && npm install
Using a github action, you can also auto update your modules.
Create a github action to update paid modules
It is possible to create a github workflow to automate the update of your paid modules through use of pull requests :
update-docxtemplater-modules-pull-request.yml
# This workflow updates the docxtemplater modules to the latest version and creates a PR to the given branch.
# It runs at 2:00 AM every day and can also be triggered manually.
#
# Why this workflow?
# - Keeps your docxtemplater dependencies up-to-date automatically
# - Ensures you have the latest bug fixes and features
# - Maintains security by updating to patched versions
# - Reduces manual update overhead
#
# How to set this up:
# 1. Copy this workflow to your .github/workflows directory
# 2. Create a fine-grained personal access token (PAT) with:
#    - 'Contents' permission set to 'Read and write'
#    - 'Pull requests' permission set to 'Read and write'
# 3. Add the PAT to your repository secrets with name 'PAT'
# 4. Customize the environment variables below if needed
#
# What this does:
# - Checks daily for updates to docxtemplater modules
# - Creates a separate branch for updates
# - Runs npm install to update package-lock.json
# - Creates a PR if there are changes
# - Avoids creating duplicate PRs
#
# Note: This workflow is especially useful if you use docxtemplater
# with additional modules like:
# - docxtemplater-image-module
# - docxtemplater-chart-module
# - docxtemplater-html-module
# As it will keep all related modules in sync

name: Update docxtemplater modules and create new pull request
on:
    workflow_dispatch:
    schedule:
        - cron: "0 2 * * *" # Runs at 2 AM daily
jobs:
    release:
        name: Update docxtemplater modules to the latest version and create new pull request
        permissions:
            contents: write
            pull-requests: write
        runs-on: ubuntu-latest
        env:
            BASE: develop # The branch to compare the changes to
            HEAD: chore/update-docxtemplater-modules # The branch to commit the changes to
            AUTHOR_EMAIL: "gh-action@github.com" # The email address of the commit author
            AUTHOR_NAME: "Automated Deps Update" # The name of the commit author
        steps:
            - name: Checkout source code
              uses: actions/checkout@v4
              with:
                  ref: ${{ env.BASE }}
                  fetch-depth: 0
                  token: ${{ secrets.PAT }}
            - name: Commit files
              id: commit
              run: |
                  git checkout -B ${{ env.HEAD }}
                  git reset --hard origin/${{ env.BASE }}
                  npx --yes update-docxtemplater
                  npm install
                  if [ -n "$(git status --porcelain)" ]; then
                    git config --local user.email "${{ env.AUTHOR_EMAIL }}"
                    git config --local user.name "${{ env.AUTHOR_NAME }}"
                    git commit -a -m "chore(deps): Updated docxtemplater modules"
                    git push --force-with-lease --set-upstream origin ${{ env.HEAD }}
                    echo "changes_detected=true" >> $GITHUB_OUTPUT
                  else
                    echo "No changes detected, skipping commit."
                    echo "changes_detected=false" >> $GITHUB_OUTPUT
                  fi
            - name: Create PR to develop if changes detected and no PR exists
              if: steps.commit.outputs.changes_detected == 'true'
              env:
                  GH_TOKEN: ${{ secrets.PAT }}
              run: |
                  pr_number=$(gh pr list --base ${{ env.BASE }} --head ${{ env.HEAD }} --state open --json number --jq '.[0].number // empty')
                  if [[ -z "$pr_number" ]]; then
                    gh pr create --base ${{ env.BASE }} --head ${{ env.HEAD }} --title "Update docxtemplater modules" --body "This PR updates the docxtemplater modules to the latest version."
                  fi
How can I retrieve the latest version of docxtemplater-docker ?
We maintain an RSS feed for each module and for the docker version.
You can get the latest version of a module or of the docker version with this bash comman :
latest_version="$(curl -s "https://docxtemplater.com/modules/docker/releases.rss" |
    grep -Eo '<title><!\[CDATA\[version [0-9.]+' |
    head -n 1 |
    sed -r "s@.*version )"
echo "Latest version of docker image is $latest_version"
You could then automate even further and run :
# You need to replace the ***** by your valid license keys.
wget "https://modules.docxtemplater.com/packages/v2/*******/*********/docker-${latest_version}.tar.gz"
mkdir docker-docxtemplater
tar xzvf "docker-${latest_version}.tar.gz" --directory docker-docxtemplater
cd docker-docxtemplater
./run.bash
How can I retrieve the docx content as text ?
You can use the following code sample, that doesn't use docxtemplater directly.
const PizZip = require("pizzip");
const { DOMParser } = require("@xmldom/xmldom");
const fs = require("fs");
const path = require("path");

function str2xml(str) {
    if (str.charCodeAt(0) === 65279) {
        // BOM sequence
        str = str.substr(1);
    }
    return new DOMParser().parseFromString(str, "text/xml");
}

function getParagraphs(content) {
    const zip = new PizZip(content);
    const xml = str2xml(zip.files["word/document.xml"].asText());
    const paragraphsXml = xml.getElementsByTagName("w:p");
    const paragraphs = [];

    for (let i = 0, len = paragraphsXml.length; i < len; i++) {
        let fullText = "";
        const textsXml =
            paragraphsXml[i].getElementsByTagName("w:t");
        for (let j = 0, len2 = textsXml.length; j < len2; j++) {
            const textXml = textsXml[j];
            if (textXml.childNodes) {
                fullText += textXml.childNodes[0].nodeValue;
            }
        }

        paragraphs.push(fullText);
    }
    return paragraphs;
}

// Load the docx file as binary content
const content = fs.readFileSync(
    path.resolve(__dirname, "examples/cond-image.docx"),
    "binary"
);

// Will print ['Hello John', 'how are you ?'] if the document has two paragraphs.
console.log(getParagraphs(content));
Skip templating of docProps/core.xml, docProps/custom.xml or docProps/app.xml
If your docx document contains some tags inside docProps/core.xml or docProps/custom.xml or docProps/app.xml, it is possible that the templating fails if there are some characters such as "{" or "}" in the contents of those files.
It is possible to not do any templating on those files using following code :
const avoidRenderingCoreXMLModule = {
    name: "avoidRenderingCoreXMLModule",
    getFileType({ doc }) {
        doc.targets = doc.targets.filter(function (file) {
            if (
                file === "docProps/core.xml" ||
                file === "docProps/app.xml" ||
                file === "docProps/custom.xml"
            ) {
                return false;
            }
            return true;
        });
    },
};
const doc = new Docxtemplater(zip, {
    modules: [avoidRenderingCoreXMLModule],
    paragraphLoop: true,
    linebreaks: true,
});
doc.render();
Common Errors
Error 'The scope parser for the tag "%image" failed to compile'
If you have the error :
It means that you didn't attach the docxtemplater-image module.
To do this, you need to have following line ;
const imageOptions = {
    getImage(tagValue, tagName, meta) {
        console.log({ tagValue, tagName, meta });
        return fs.readFileSync(tagValue);
    },
    getSize(img) {
        // it also is possible to return a size in centimeters, like this : return [ "2cm", "3cm" ];
        return [150, 150];
    },
};

const doc = new Docxtemplater(zip, {
    modules: [new ImageModule(imageOptions)],
    paragraphLoop: true,
    linebreaks: true,
    // other options such as parser, delimiters, paragraphLoop, ...
});
doc.render(/* data */);
See the image module docs for the full documentation about how to use the image-module.
Empty pages generated
Pages generated before or after a table
If your template is the following :
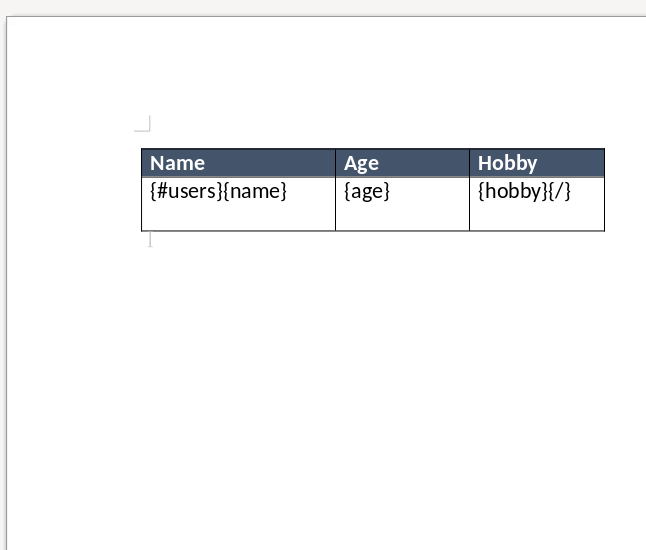
With following data :
doc.render({
    users: [
        { name: "John", age: 25, hobby: "Skiing" },
        { name: "Mary", age: 35, hobby: "Reading" },
        { name: "Jack", age: 35, hobby: "Reading" },
        { name: "Jack", age: 35, hobby: "Reading" },
        { name: "Jack", age: 35, hobby: "Reading" },
        { name: "Jack", age: 35, hobby: "Reading" },
        { name: "Jack", age: 35, hobby: "Reading" },
        { name: "Jack", age: 35, hobby: "Reading" },
    ],
});
It is possible that your template will create an unwanted empty page before the table or after the table, like this :
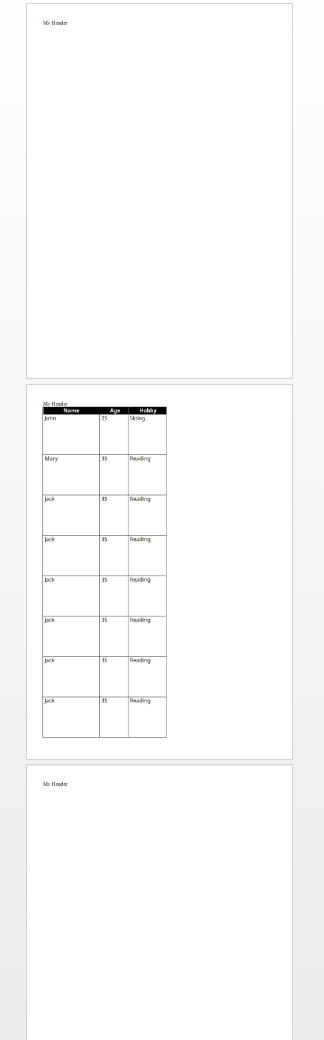
There are several things that you can check on the table to fix this.
Many times, there is a tag called
<w:keepNext>that is set on the table.When this tag is specified on a given paragraph, it means that it should be rendered on the same page as the next paragraph when possible. If multiple paragraphs are to be kept together but they exceed a page, then the set of paragraphs begin on a new page and page breaks are used thereafter as needed.
Reference: ECMA-376, 3rd Edition (June, 2011), Fundamentals and Markup Language Reference § 17.3.1.15.
It is possible to fix this issue by changing the paragraph properties and unchecking "Keep with next", like this :
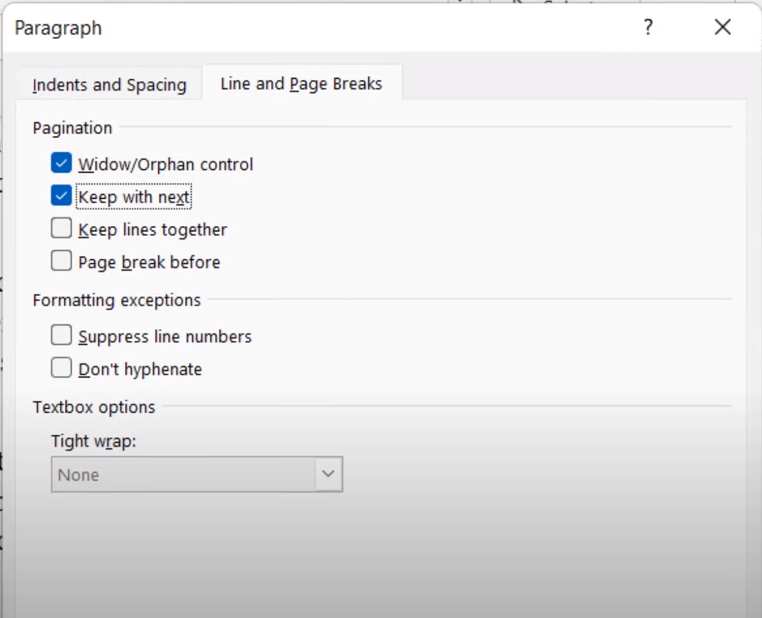
Paragraph properties to change Also, you have to check paragraphs preceding the table, if there are some empty paragraphs and you don't need them, you can remove them.
To remove the pagebreak that comes right after the table, there is another trick :
Each table in word requires to have a paragraph right after the table. This means that even if the table fits into the page, the paragraph that comes right after the table will sometimes force the page to break.
To fix this, I recommend you to change the fontsize of the paragraph that comes right after the table to a font-size of "1".
Last page empty when using a loop that contains a page or section break
If you include a pagebreak inside a loop, you will get an empty page at the end of your document.
For example, in this document :
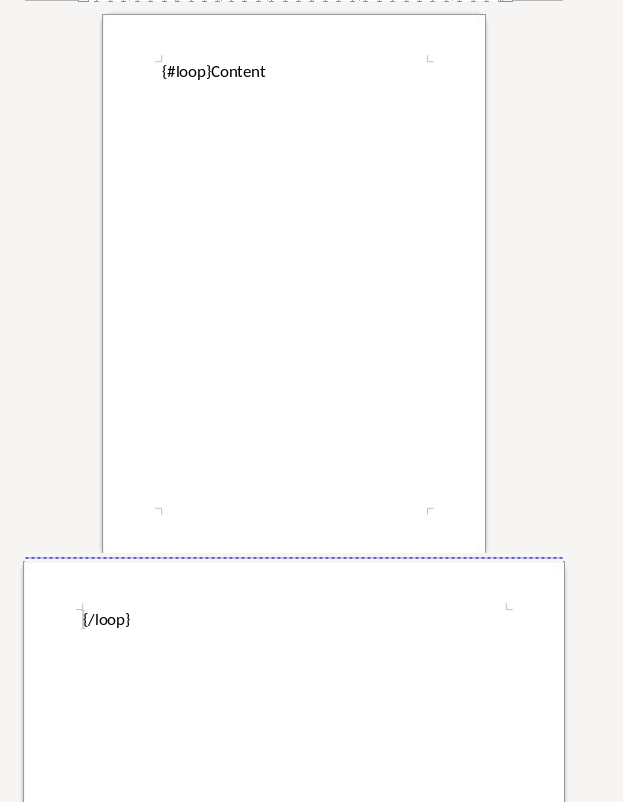
In this case, the last page in the generated document will be an empty page.
It is possible to use the "dropLastPageIfEmpty()" method from the meta module to fix this issue.
Is it possible to include an Excel document into a Word document ?
At the current time, it is not possible to include an excel document into a Word document.
The reason for this is that in the OpenXML Specification, (the specification of the docx/pptx/xlsx formats), when you embed an Excel file in a Word file, Word will store a preview of the excel document that it will show on the Word interface. This preview is an image that is taken by Microsoft Word itself. If this image preview is not present in the file, it will not show the excel file correctly. To generate this image preview, docxtemplater would have to have a rendering engine that can convert an XLSX file into an image file, which is currently not possible because creating a rendering engine that handles all cases would be quite difficult.
Corrupted zip : can't find end of central directory
This error message comes from the PizZip library, not from docxtemplater itself.
If you see this issue when you generate a document, it can mean multiple things :
The document could be password-protected.
The document could be a non-zip file (because all docx/pptx/xlsx files are actually zip files). In the browser environment, this typically happens when the response to your zip contains something else than a zip file (quite often, the contents of a 404 in HTML).
You can run the following code to see what the mime type and the buffer length of your file is :
const fs = require("fs");
const Docxtemplater = require("docxtemplater");
const PizZip = require("pizzip");
const magic = require("file-type-checker");

const buf = fs.readFileSync("examples/tag-image.pptx");

function logSignature(buf) {
    const type = magic.detectFile(buf);
    console.log("buffer length", buf.length);
    console.log("mime type is : ", type);
}
logSignature(buf);

const zip = new PizZip(buf);
const doc = new Docxtemplater(zip, {
    paragraphLoop: true,
    linebreaks: true,
});
doc.render(data);
EvalError: Code generation from strings disallowed for this context
If you run your application in a browser (Chrome, Firefox, Safari), and you define a CSP (Content Security Policy), you could see following error :
This error happens if you use the expressionParser, which by default will use "new Function(generatedCode)" to execute code that was compiled.
For example, when in your template, you write :
Internally, the expressionParser will convert the "user.name" expression into a function, like this :
new Function("u", "if (u!= null) { return u.name }");
This can be disallowed, and thus generate a stacktrace.
However, you can disable the usage of dynamic functions like this, by instead using the following code :
const expressionParser = require("docxtemplater/expressions.js");
new Docxtemplater(zip, {
    parser: expressionParser.configure({
        csp: true, // this disables the use of "new Function", useful for Vercel, Deno, CSP environment
    }),
});
Inserting new lines
const doc = new Docxtemplater(zip, {
    linebreaks: true,
    paragraphLoop: true,
});
doc.render(/* data */);
then in your data, if a string contains a newline, it will be translated to a linebreak in the document.
Insert HTML formatted text
It is possible to insert HTML formatted text using the HTML pro module
Generate smaller docx using compression
Since version 3.62.0 of docxtemplater, when you use the doc.toBuffer() methods, compression: "DEFLATE" will automatically apply, making the docx output file smaller.
If you use the doc.getZip().generate() API, the size of the docx output can be big, in the case where you generate the zip the following way:
const buf = doc.getZip().generate({ type: "nodebuffer" });
fs.writeFileSync("output.docx", buf);
This is because the zip will not be compressed in that case. To force the compression (which will slow down the generation for output files larger than 10 MB).
const buf = doc.getZip().generate({
    type: "nodebuffer",
    /*
     * compression: DEFLATE adds a compression step.
     * For a 50MB output document, expect 500ms additional CPU time
     */
    compression: "DEFLATE",
});
fs.writeFileSync("output.docx", buf);
Writing if else
To write if/else, see the documentation on sections for if and inverted sections for else.
Using boolean operators (AND, OR) and comparison operators (<, >)
You can also have conditions with comparison operators (< and >), or boolean operators (&& and ||) using angular parser conditions.
Conditional Formatting
With the docxtemplater styling module it is possible to have a table cell be styled depending on a given condition (for example).
Using data filters
You might want to be able to show data a bit differently for each template. For this, you can use the angular parser and the filters functionality.
For example, if a user wants to put something in uppercase, you could write in your template:
See angular parser for comprehensive documentation
Keep placeholders that don't have data
It is possible to define which value to show when a tag resolves to undefined or null (for example when no data is present for that value).
For example, with the following template
{
    "hobby": "football"
}
The default behavior is to return "undefined" for empty values.
You can customize this to either return another string, or return the name of the tag itself, so that it will show:
It is possible to customize the value that will be shown for {name} by using the nullGetter option. In the following case, it will return "{name}", hence it will keep the placeholder {name} if the value does not exist.
function nullGetter(part) {
    if (part.raw) {
        return "{" + part.raw + "}";
    }
    if (!part.module && part.value) {
        return "{" + part.value + "}";
    }
    return "";
}
const doc = new Docxtemplater(zip, {
    nullGetter,
    linebreaks: true,
    paragraphLoop: true,
});
doc.render(/* data */);
Highlight placeholders that don't have data
If you have access to the HTML module, it is possible to highlight fields that have no data.
The following template, when having no "age" property :
Will render :
Hello John, age {age}
See this documentation part to see how to make this work.
Collect list of placeholder that are undefined
By specifying a custom nullGetter, you can collect the list of tags that are in your template but not present in your data.
For example, if your template is :
And your data doesn't contain a name property, you can handle this by using a check on nullValues after running the code with this nullGetter.
const nullValues = [];
const templaterOptions = {
    paragraphLoop: true,
    linebreaks: true,
    nullGetter(part, scopeManager) {
        nullValues.push(
            [].concat(scopeManager.scopePath).concat(part.value)
        );
        if (!part.module) {
            return "undefined";
        }
        if (part.module === "rawxml") {
            return "";
        }
        return "";
    },
};

const doc = new Docxtemplater(zip, templaterOptions);
doc.render(/* data */);

if (nullValues.length > 0) {
    // In the above example, nullValues will be [["name"]]
    console.log(nullValues);
    // Here you can handle nullValues to throw an error, send a HTTP response 400, show an alert to the user, ...
}
Performance
Docxtemplater is quite fast, for a pretty complex 50 page document, it can generate 250 output of those documents in 44 seconds, which is about 180ms per document.
There also is an interesting blog article on my personal blog that explains how I optimized loops in docxtemplater back in 2016.
Here are some performance improvements that can be done :
Support for IE9 and lower
docxtemplater should work on almost all browsers: IE7+, Safari, Chrome, Opera, Firefox.
The only 'problem' is to load the binary file into the browser. This is not in docxtemplater's scope, but here is the recommended code to load the zip from the browser.
The following code should load the binary content on all browsers:
PizZipUtils.getBinaryContent(
    "path/to/content.zip",
    function (err, data) {
        if (err) {
            throw err; // or handle err
        }

        const zip = new PizZip(data);
        const doc = new Docxtemplater(zip);
        doc.render(/* data */);
    }
);
Get list of placeholders
To be able to construct a form dynamically or to validate the document beforehand, it can be useful to get access to all placeholders defined in a given template. Before rendering a document, docxtemplater parses the Word document into a compiled form. In this compiled form, the document is stored in an AST which contains all the necessary information to get the list of the variables and list them in a JSON object.
With the simple inspection module, it is possible to get this compiled form and show the list of tags. suite:
const InspectModule = require("docxtemplater/js/inspect-module.js");
const iModule = InspectModule();
const doc = new Docxtemplater(zip, {
    modules: [iModule],
    linebreaks: true,
    paragraphLoop: true,
});
doc.render(/* data */);
const tags = iModule.getAllTags();
console.log(tags);
/*
 * After getting the tags, you can render the document like this:
 * doc.render(data);
 */
With the following template:
{#users}
{name}
{age}
{/users}
It will log this object:
{
    "company": {},
    "users": {
        "name": {},
        "age": {}
    }
}
To know which modules are used for each tag (image-module/raw-xml-module/loop-module/style-module), it is possible to instead use the getStructuredTags API :
const InspectModule = require("docxtemplater/js/inspect-module.js");
const iModule = InspectModule();
const doc = new Docxtemplater(zip, {
    modules: [iModule],
    linebreaks: true,
    paragraphLoop: true,
});
const tags = iModule.getStructuredTags();
console.log(tags);
// After getting the tags, you can render the document like this:
doc.render(data);
You can also get the whole compiled document using:
const InspectModule = require("docxtemplater/js/inspect-module.js");
const iModule = InspectModule();
const doc = new Docxtemplater(zip, {
    modules: [iModule],
    linebreaks: true,
    paragraphLoop: true,
});
// for Word documents :
console.log(iModule.fullInspected["word/document.xml"]);
// for Powerpoint presentations :
console.log(iModule.fullInspected["ppt/slides/slide1.xml"]);
// for Excel sheets :
console.log(iModule.fullInspected["xl/worksheets/sheet1.xml"]);
doc.render(/* data */);
Here's the code of the inspect-module, which you can use as an inspiration to retrieve the exact information that you need in the structure that you want.
Note about the angular-expressions feature with the tag {%img | size:20:20} this will output to you : img | size:20:20
You can extract only the Identifiers from the angular-expressions using this function (this needs docxtemplater 3.37.2) :
const expressionParser = require("docxtemplater/expressions.js");
const tag = "img | size:200:300";
const identifiers = expressionParser(tag).getIdentifiers();
console.log(identifiers);
/*
 * identifiers will be ["img"]
 * For the tag { firstName + lastName }, it will return ["firstName", "lastName"]
 */
Preview docx file in a browser
Here are the solutions that we know about to preview docx files in a browser :
Free - Use
https://view.officeapps.live.com/op/view.aspx?src=<your_url>For example, you can view one of our sample files here. You can use an iframe to show that preview right into your application.Free - You can use one of the docx to pdf conversion tools shown just below, and use a PDF previewer in the browser.
Paid licence - You can also use Superdoc which also offers a docx preview but is quite new, and will have more rendering issues then OfficeApps.live.com
Convert to PDF
It is not possible to convert docx to PDF with docxtemplater, because docxtemplater is a templating engine and doesn't know how to render a given document. There are many tools to do this conversion.
The first one is to use libreoffice headless, which permits you to generate a PDF from a docx document:
You just have to run:
libreoffice --headless --convert-to pdf --outdir . input.docx
This will convert the input.docx file into input.pdf file.
The rendering is not 100% perfect, since it uses libreoffice and not microsoft word. If you just want to render some preview of a docx, I think this is a possible choice. You can do it from within your application by executing a process, it is not the most beautiful solution but it works.
If you want something that does the rendering better, I think you should use some specialized software.
The ones I do recommend would be (most recommended on top, I have no partnership with any of those recommendations) :
ConvertAPI , commercial, API
Apryse, commercial, can be self hosted
Aspose Commercial, Cloud
cm2pdf, Commercial, self-hosted, command line
Pptx support
Docxtemplater handles pptx files without any special configuration (since version 3.0.4).
It does so by looking at the content of the "[Content_Types].xml" file and by looking at some docx/pptx specific content types.
My document is corrupted, what should I do ?
If you are inserting multiple images inside a loop, it is possible that word cannot handle the docPr attributes correctly. You can try to add the following code before instantiating the Docxtemplater instance.
const fixDocPrCorruptionModule = {
    set(options) {
        if (options.Lexer) {
            this.Lexer = options.Lexer;
        }
        if (options.zip) {
            this.zip = options.zip;
        }
    },
    on(event) {
        if (event === "attached") {
            this.attached = false;
        }
        if (event !== "syncing-zip") {
            return;
        }
        const zip = this.zip;
        const Lexer = this.Lexer;
        let prId = 1;
        function setSingleAttribute(partValue, attr, attrValue) {
            const regex = new RegExp(
                `(<.* ${attr}=")([^"]+)(".*)$`
            );
            if (regex.test(partValue)) {
                return partValue.replace(
                    regex,
                    `$1${attrValue}$3`
                );
            }
            let end = partValue.lastIndexOf("/>");
            if (end === -1) {
                end = partValue.lastIndexOf(">");
            }
            return (
                partValue.substr(0, end) +
                ` ${attr}="${attrValue}"` +
                partValue.substr(end)
            );
        }
        zip.file(/\.xml$/).forEach(function (f) {
            let text = f.asText();
            const xmllexed = Lexer.xmlparse(text, {
                text: [],
                other: ["wp:docPr"],
            });
            if (xmllexed.length > 1) {
                text = xmllexed.reduce(function (
                    fullText,
                    part
                ) {
                    if (
                        part.tag === "wp:docPr" &&
                        ["start", "selfclosing"].indexOf(
                            part.position
                        ) !== -1
                    ) {
                        return (
                            fullText +
                            setSingleAttribute(
                                part.value,
                                "id",
                                prId++
                            )
                        );
                    }
                    return fullText + part.value;
                }, "");
            }
            zip.file(f.name, text);
        });
    },
};
const doc = new Docxtemplater(zip, {
    modules: [fixDocPrCorruptionModule],
    linebreaks: true,
    paragraphLoop: true,
});
doc.render(/* data */);
Attaching modules for extra functionality
If you have created or have access to docxtemplater PRO modules, you can attach them with the following code:
const doc = new Docxtemplater(zip, {
    modules: [
        /* ...*/
    ],
    paragraphLoop: true,
    linebreaks: true,
});
doc.render(data);
Ternaries are not working well with angular-parser
There is a common issue which is to use ternary on scopes that are not the current scope, which makes the ternary appear as if it always showed the second option.
For example, with following data:
doc.render({
    user: {
        gender: "F",
        name: "Mary",
        hobbies: [
            {
                name: "play football",
            },
            {
                name: "read books",
            },
        ],
    },
});
And by using the following template:
{name} is a kind person.
{#hobbies}
- {gender == 'F' : 'She' : 'He'} likes to {name}
{/hobbies}
{/}
This will print:
- He likes to play football
- He likes to read books
Note that the pronoun "He" is used instead of "She".
The reason for this behavior is that the {gender == 'F' : "She" : "He"} expression is evaluating in the scope of hobby, where gender does not even exist. Since the condtion gender == 'F' is false (since gender is undefined), the return value is "He". However, in the scope of the hobby, we do not know the gender so the return value should be null.
We can instead write a custom filter that will return "She" if the input is "F", "He" if the input is "M", and null if the input is anything else.
The code would look like this:
const expressionParser = require("docxtemplater/expressions.js");
expressionParser.filters.pronoun = function (input) {
    if (input === "F") {
        return "She";
    }
    if (input === "M") {
        return "He";
    }
    return null;
};
And use the following in your template:
{name} is a kind person.
{#hobbies}
- {gender | pronoun} likes to {name}
{/hobbies}
{/}
Multi scope expressions do not work with the angularParser
Since version 3.32.3, this behavior should be fixed if you use the following parser :
const expressionParser = require("docxtemplater/expressions.js");
new Docxtemplater(zip, {
    parser: expressionParser,
    paragraphLoop: true,
    linebreaks: true,
});
Access to XMLHttpRequest at file.docx from origin 'null' has been blocked by CORS policy
This happens if you use the HTML sample script but are not using a webserver.
If your browser window shows a URL starting with file://, then you are not using a webserver, but the filesystem itself.
For security reasons, the browsers don't let you load files from the local file system.
To do this, you have to setup a small web server.
The simplest way of starting a webserver is to run following command:
npx http-server
# if you don't have npx, you can also do:
# npm install -g http-server && http-server .
On your production server, use a more robust webserver such as nginx, or any webserver that you are currently using for static files.
Docxtemplater in a React project
There is an online react demo available on stackblitz.
You can use the following code:
import React from "react";
import Docxtemplater from "docxtemplater";
import PizZip from "pizzip";
import PizZipUtils from "pizzip/utils/index.js";
import { saveAs } from "file-saver";

function loadFile(url, callback) {
    PizZipUtils.getBinaryContent(url, callback);
}

export const App = class App extends React.Component {
    render() {
        function generateDocument() {
            loadFile(
                "https://docxtemplater.com/tag-example.docx",
                function (error, content) {
                    if (error) {
                        throw error;
                    }
                    const zip = new PizZip(content);
                    const doc = new Docxtemplater(zip, {
                        paragraphLoop: true,
                        linebreaks: true,
                    });
                    doc.render({
                        first_name: "John",
                        last_name: "Doe",
                        phone: "0652455478",
                        description: "New Website",
                    });
                    const out = doc.getZip().generate({
                        type: "blob",
                        mimeType:
                            "application/vnd.openxmlformats-officedocument.wordprocessingml.document",
                    }); // Output the document using Data-URI
                    saveAs(out, "output.docx");
                }
            );
        }

        return (
            <div className="p-2">
                <h1>Test docxtemplater</h1>
                <button onClick={generateDocument}>
                    Generate document
                </button>
                <p>
                    Click the button above to generate a document
                    using ReactJS
                </p>
                <p>
                    You can edit the data in your code in this
                    example. In your app, the data would come
                    from your database for example.
                </p>
            </div>
        );
    }
};
Docxtemplater in an angular project
There is an online angular demo available on stackblitz.
If you are using an angular version that supports the import keyword, you can use the following code:
import { Component } from "@angular/core";
import Docxtemplater from "docxtemplater";
import PizZip from "pizzip";
import PizZipUtils from "pizzip/utils/index.js";
import { saveAs } from "file-saver";

function loadFile(url, callback) {
    PizZipUtils.getBinaryContent(url, callback);
}

@Component({
    selector: "app-product-list",
    templateUrl: "./product-list.component.html",
    styleUrls: ["./product-list.component.css"],
})
export class ProductListComponent {
    generate() {
        loadFile(
            "https://docxtemplater.com/tag-example.docx",
            function (error: Error | null, content: string) {
                if (error) {
                    throw error;
                }
                const zip = new PizZip(content);
                const doc = new Docxtemplater(zip, {
                    paragraphLoop: true,
                    linebreaks: true,
                });
                doc.render({
                    first_name: "John",
                    last_name: "Doe",
                    phone: "0652455478",
                    description: "New Website",
                });
                // Output the document using Data-URI
                saveAs(doc.toBlob(), "output.docx");
            }
        );
    }
}
Docxtemplater in a Vuejs project
There is an
There is an online vuejs 3.x demo available on stackblitz. The vuejs 2.x demo is here.
If you are using vuejs version that supports the import keyword, you can use the following code:
import Docxtemplater from "docxtemplater";
import PizZip from "pizzip";
import PizZipUtils from "pizzip/utils/index.js";
import { saveAs } from "file-saver";

function loadFile(url, callback) {
    PizZipUtils.getBinaryContent(url, callback);
}

export default {
    methods: {
        renderDoc() {
            loadFile(
                "https://docxtemplater.com/tag-example.docx",
                function (error, content) {
                    if (error) {
                        throw error;
                    }
                    const zip = new PizZip(content);
                    const doc = new Docxtemplater(zip, {
                        paragraphLoop: true,
                        linebreaks: true,
                    });
                    doc.render({
                        first_name: "John",
                        last_name: "Doe",
                        phone: "0652455478",
                        description: "New Website",
                    });

                    const out = doc.getZip().generate({
                        type: "blob",
                        mimeType:
                            "application/vnd.openxmlformats-officedocument.wordprocessingml.document",
                    });
                    // Output the document using Data-URI
                    saveAs(out, "output.docx");
                }
            );
        },
    },

    template: `
    <button @click="renderDoc">
       Render docx template
    </button>
  `,
};
Docxtemplater in a Next.js project
There is an online nextjs demo available on stackblitz.
You can use the following code:
"use client";

import Docxtemplater from "docxtemplater";
import PizZip from "pizzip";
import { saveAs } from "file-saver";
let PizZipUtils = null;
if (typeof window !== "undefined") {
    import("pizzip/utils/index.js").then(function (r) {
        PizZipUtils = r;
    });
}

function loadFile(url, callback) {
    PizZipUtils.getBinaryContent(url, callback);
}

function generateDocument() {
    loadFile(
        "https://docxtemplater.com/input.docx",
        function (error, content) {
            if (error) {
                throw error;
            }
            const zip = new PizZip(content);
            const doc = new Docxtemplater(zip, {
                linebreaks: true,
                paragraphLoop: true,
            });
            // render the document (replace all occurences of {first_name} by John, {last_name} by Doe, ...)
            doc.render({
                first_name: "John",
                last_name: "Doe",
                phone: "0652455478",
                description: "New Website",
            });
            const blob = doc.toBlob();
            // Output the document using Data-URI
            saveAs(blob, "output.docx");
        }
    );
}

export default function Home() {
    return (
        <main>
            <div>
                <div>
                    <h1> Test Docxtemplater</h1>
                </div>
                <button onClick={generateDocument}>
                    Generate document
                </button>
                <p>
                    Click the button above to generate a document
                    using NextJS
                </p>
                <p>
                    You can edit the data in your code in this
                    example. In your app, the data would come
                    from your database for example.
                </p>
            </div>
        </main>
    );
}
Adding page break from a tag
It is possible, in a rawxmltag, to add a page break. For example this could allow you to conditionally add a page break.
The template will look like this:
{@pageBreak}
{text}
{/}
In your code, use the following :
const doc = new Docxtemplater(zip, {
    paragraphLoop: true,
    linebreaks: true,
});
doc.render({
    cond: true,
    pageBreak: '<w:p><w:r><w:br w:type="page"/></w:r></w:p>',
    text: "Hello world",
});
Getting access to page number / total number of pages height of element or regenerate Table of Contents
Sometimes, you would like to know what are the total number of pages in the document, or what is the page number at the current tag position.
Or another request would be to know how much spacing is left after inserting a Table.
This is something that will never be achievable with docxtemplater, because docxtemplater is only a templating engine: it only knows how to parse the docx format. However, it has no idea on how the docx is rendered at the end: the width, height of each paragraph determines the number of pages in a document.
Since docxtemplater does not know how to render a docx document, (which determines the page numbers), this is why it is impossible to regenerate the page numbers within docxtemplater.
Also, even across different "official" rendering engines, the page numbers may vary. Depending on whether you open a document with Office Online, Word 2013 or Word 2016 or the Mac versions of Word, you can have some slight differences that will, at the end, influence the number of pages or the position of some elements within a page.
The amount of work to write a good rendering engine would be very huge (a few years at least for a team of 5-10 people).
Special character keys with angular parser throws error
The error that you could see is this, when using the tag {être}.
Since version 3.32.3, this error will not appear anymore if you use the following parser :
const expressionParser = require("docxtemplater/expressions.js");
const doc = new Docxtemplater(zip, {
    parser: expressionParser,
    paragraphLoop: true,
    linebreaks: true,
});
doc.render(/* data */);
Remove proofstate tag
The proofstate tag in a document marks the document as spell-checked when last saved. After rendering a document with docxtemplater, some spelling errors might have been introduced by the addition of text. The proofstate tag is by default, not removed.
To remove it, one could do the following, starting with docxtemplater 3.17.2
const proofstateModule = require("docxtemplater/js/proof-state-module.js");
const doc = new Docxtemplater(zip, {
    modules: [proofstateModule],
    paragraphLoop: true,
    linebreaks: true,
});
doc.render(/* data */);
Adding a Page Break After Each Loop Item (Except the Last) to create a multi page document
When generating multi-page documents using loops, you often want each item to start on a new page. This can be achieved by inserting a page break at the end of each loop iteration.
However, if you add a page break unconditionally, it will also appear after the last item — which is usually undesirable. To avoid that, you can use a custom parser to detect whether the current item is the last one in the loop, and insert a page break only when it’s not.
🔧 Learn more about how custom parsers work in the Extended Parser Configuration guide.
Example Template
In your template, you can insert a conditional tag where the page break should appear:
The user {name} is aged {age}
{description}
Some other content
{@$pageBreakExceptLast}
{/}
In this example, the @$pageBreakExceptLast tag will be replaced with a page break after each user block — except the last one.
Custom Parser Configuration
To support this behavior, configure the parser with logic that checks if the current loop item is the last:
const expressionParser = require("docxtemplater/expressions.js");

const doc = new Docxtemplater(zip, {
    parser: expressionParser.configure({
        evaluateIdentifier(tag, scope, scopeList, context) {
            if (
                context.meta.part.module === "rawxml" &&
                tag === "$pageBreakExceptLast"
            ) {
                const totalLength =
                    context.scopePathLength.at(-1);
                const index = context.scopePathItem.at(-1);
                const isLast = index === totalLength - 1;
                return isLast
                    ? ""
                    : '<w:p><w:r><w:br w:type="page"/></w:r></w:p>';
            }
        },
    }),
    paragraphLoop: true,
    linebreaks: true,
});

doc.render();
This setup ensures that a page break is inserted after every item in the loop — except the last one — resulting in a clean, professional-looking paginated document.
Encrypting files
Docxtemplater itself does not handle the Encryption of the docx files.
There seem to be two solutions for this:
- Use a Python tool that does exactly this, it is called msoffcrypto
- The xlsx-populate library also implements the Encryption/Decryption (algorithms are inspired by msoffcrypto-tool), however, the code probably needs to be a bit changed to work with docxtemplater. Here's the source code.
Assignment expression in template
By using the angular expressions options, it is possible to add assignment expressions (for example {full_name = first_name + last_name} in your template. See following part of the doc.
Changing the end-user syntax
If you find that the loop syntax is a bit too complex, you can change it to something more human friendly (but more verbose). This could be used to have a syntax more similar to what the software "HotDocs" provides.
For example, you could be willing to write loops like this :
Hello {name}
{ENDFOR}
Instead of
Hello {name}
{/}
This can be done by changing the prefix of the loop module, which is a builtin module.
const doc = new Docxtemplater(zip, {
    modules: [
        {
            optionsTransformer(options, doc) {
                doc.modules.forEach(function (module) {
                    if (module.name === "LoopModule") {
                        module.prefix.start = "FOR ";
                        module.prefix.end = /^ENDFOR ?(.*)/;
                    }
                });
                return options;
            },
        },
    ],
    paragraphLoop: true,
    linebreaks: true,
});
doc.render(/* data */);
Note that if you don't like the default delimiters which are { and }, you can also change them, for example :
If you prefer to write :
Hello [[name]]
[[ENDFOR]]
You could write your code like this :
const doc = new Docxtemplater(zip, {
    delimiters: { start: "[[", end: "]]" },
    modules: [
        {
            optionsTransformer(options, doc) {
                doc.modules.forEach(function (module) {
                    if (module.name === "LoopModule") {
                        module.prefix.start = "FOR ";
                        module.prefix.end = /^ENDFOR ?(.*)/;
                    }
                });
                return options;
            },
        },
    ],
    paragraphLoop: true,
    linebreaks: true,
});
doc.render(/* data */);
Note that it is however not possible to use no delimiters at all, docxtemplater forces you to have some delimiters.
Similarly, for each paid module (image module, ...), you can set your own prefixes as well.
For example, for the image module, if you would like to write {IMG mydata} instead of {%mydata} and {CENTERIMG mydata} instead of {%%mydata}, you can write your code like this :
const ImageModule = require("docxtemplater-image-module");

const opts = {};
opts.centered = false;
opts.getImage = function (tagValue, tagName) {
    console.log("tagName is " + tagName); // if the tag is {%myImage}, tagName is :"myImage"
    return fs.readFileSync(tagValue);
};

opts.getSize = function (/* img, tagValue, tagName */) {
    // img is the value returned by getImage
    return [150, 150];
};

const imageModule = new ImageModule(opts);
imageModule.prefix.normal = "IMG ";
imageModule.prefix.centered = "CENTERIMG ";
const doc = new Docxtemplater(zip, {
    modules: [
        imageModule,
        {
            optionsTransformer(options, doc) {
                doc.modules.forEach(function (module) {
                    if (module.name === "LoopModule") {
                        module.prefix.start = "FOR ";
                        module.prefix.end = /^ENDFOR ?(.*)/;
                    }
                });
                return options;
            },
        },
    ],
    delimiters: { start: "[[", end: "]]" },
    paragraphLoop: true,
    linebreaks: true,
});
doc.render(/* data */);
Converting delimiters to other delimiters
It is possible to convert a given template from using some delimiters to some other delimiters.
For example, if you want to convert the following :
Hello {user},

What's up ?
To :
Hello [[user]],

What' up ?
You can do the following :
const PizZip = require("pizzip");
const Docxtemplater = require("./docxtemplater.js");
const fs = require("fs");

function convertDelimiters(input, output, from, to) {
    const zip = new PizZip(fs.readFileSync(input));

    const doc = new Docxtemplater(zip, {
        modules: [
            {
                name: "IgnoreModule",
                optionsTransformer: (options, docxtemplater) => {
                    docxtemplater.modules =
                        docxtemplater.modules.filter(
                            function (module) {
                                // You can remove this if condition if you're not using the XlsxModule
                                if (
                                    module.name === "XlsxModule"
                                ) {
                                    Object.keys(
                                        module.prefix
                                    ).forEach(function (key) {
                                        module.prefix[key] =
                                            null;
                                    });
                                    return true;
                                }
                                return module.name === "Render";
                            }
                        );
                    return options;
                },
            },
        ],
        delimiters: from,
        parser: (tag) => ({
            get: () => to.start + tag + to.end,
        }),
        paragraphLoop: true,
        linebreaks: true,
    }).render();

    fs.writeFileSync("output.docx", doc.toBuffer());
}

convertDelimiters(
    "foo.docx",
    "foo-output.docx",
    { start: "{", end: "}" },
    { start: "[[", end: "]]" }
);
Template txt files
Since version 3.33.0, it is possible to template txt files.
The usage is like this :
const TxtTemplater = require("docxtemplater/js/text.js");
const doc = new TxtTemplater("Hello {user}, how are you ?");
const result = doc.render({ user: "John" });
console.log(result); // Shows : "Hello John, how are you ?"
or, if you need the angular expressions parsing engine :
const TxtTemplater = require("docxtemplater/js/text.js");
const expressionParser = require("docxtemplater/expressions.js");
const doc = new TxtTemplater(
    "Hello {fname+lname}, how are you ?",
    {
        parser: expressionParser,
    }
);
const result = doc.render({ fname: "John ", lname: "Doe" });
console.log(result); // Shows : "Hello John Doe, how are you ?"
Debug angular parser
If the values of your tags are resolved incorrectly, you can print out the tag, scope, and result variables when running your parser.
You can use the following snippet
const expressionParser = require("docxtemplater/expressions.js");
const doc = new Docxtemplater(zip, {
    parser(tag) {
        const obj = expressionParser(tag);
        return {
            get(scope, context) {
                console.log(
                    "Evaluating:",
                    tag,
                    " on scope:",
                    scope
                );
                const result = obj.get(scope, context);
                console.log("Result is ", result);
                return result;
            },
        };
    },
    paragraphLoop: true,
    linebreaks: true,
});
doc.render({
    user: {
        name: "Mary",
    },
});
For following template :
It will log :
Evaluating:  user.name | uppercase  on scope {
    user: {
        name: "Mary",
    },
}
Result is MARY
Create "magic" values when using the angular parser
Since version 3.49.0 of docxtemplater, when using the angular parser, it is possible to configure "magic" keys to return some specific values. (This feature cannot be implemented if you use the "docxtemplater/expressions-ie11.js" package).
In your template, if you write :
{__val}
{/}
This will retrieve the val value from the scope that is above the current scope (it retrieves the value of "val" in the scope outside of the loop).
const expressionParser = require("docxtemplater/expressions.js");
const hasOwnProperty = Object.prototype.hasOwnProperty;

const doc = new Docxtemplater(zip, {
    parser: expressionParser.configure({
        evaluateIdentifier(tag, scope, scopeList, context) {
            console.log(context);
            /*
             * context contains info about the current tag
             * context.scopePathLength, context.scopePathItem, context.num, and so on
             */
            const matchesParent = /^(_{2,})(.*)/g;
            if (matchesParent.test(tag)) {
                const parentCount =
                    tag.replace(matchesParent, "$1").length - 1;
                tag = tag.replace(matchesParent, "$2");
                if (parentCount >= 1) {
                    for (
                        let i =
                            scopeList.length - 1 - parentCount;
                        i >= 0;
                        i--
                    ) {
                        const s = scopeList[i];
                        /*
                         * The hasOwnProperty part is necessary because we
                         * don't want to allow access to __proto__ and other
                         * private properties that could be used to escape the
                         * security sandbox.
                         */
                        if (
                            hasOwnProperty.call(s, tag) &&
                            s[tag] != null
                        ) {
                            const property = s[tag];
                            return typeof property === "function"
                                ? property.bind(s)
                                : property;
                        }
                    }
                }
            }
            /*
             * In other cases, we don't return any specifc value.
             * This means that it will use the standard behavior of getting the data from the scope
             */
        },
    }),
});

doc.render({
    loop: [
        {
            val: "This value",
        },
    ],
    val: "Other value", // <= This value will be retrieved
});
Table row is breaking across pages
If in your result, you've got rows breaking across pages, this is something that you can fix from your template.
Follow these steps :
- Click into a cell in the row
- Open the Layout tab under Table Tools and from the Table group select the Properties icon
- Select the Row tab
- Turn off the option to 'Allow row to break across pages'
- Repeat for any other rows in the table
- Click on OK
Security Measures
We take security very seriously. Here are our key security practices:
Minimal Dependencies: Docxtemplater has only two dependencies: "xmldom" and "pizzip". Most modules depend solely on "lodash" and "docxtemplater". For complex tasks like HTML handling (html, html-xlsx, and html-pptx modules), we use specialized modules for HTML/CSS/color parsing.
Restricted Access: No usage of "fs", "http", "https", or "eval" within docxtemplater or any modules.
Regular Updates: All servers receive monthly updates at minimum, with security patches applied promptly.
Limited Scope: We strictly focus on document generation (input.docx + data.json => output.docx), minimizing attack surface and potential vulnerabilities.
Containerization: Enterprise version includes a Docker container option that isolates document generation processes for enhanced security.
Dependency Scanning: Regular automated scans for vulnerabilities in dependencies.
Technical specification
Programming Language and Framework: JavaScript, no framework is used
Database Technology: The application is a software library and not a web application. Therefore, no database is required for the operation of the application. Data is provided to the library in the form of JSON.
Architecture Pattern: As it is a software library, the architecture consists of multiple npm packages (one package per module). Technically, docxtemplater provides an open-source core engine, and docxtemplater modules can be attached to a docxtemplater instance to provide additional functionnality.
Middleware and Integrations: No middleware components or API gateways are used.
Purpose and Objectives: The software library enables the creation of documents with Word, PowerPoint, or Excel templates and data.
Functions and Features: Generation of Word and PowerPoint documents with the open-source version, Excel documents with the Excel module. Ability to dynamically create images with the Image module
User Target Audience: Developers can install and configure the library. Normal Word/PowerPoint/Excel users that know how to use the Microsoft Office suite can create templates.
Platform and Compatibility: NodeJS version 18, 20, Browser (Chrome, Firefox, Safari, Edge). It runs correctly on Linux, Windows, Mac
User Interface: Technically, docxtemplater has no user interface, and needs to be integrated into an existing application.
Integrations and Interfaces: Integration is done with code, specifically with JavaScript.
Security: The software library does not access "external" services, meaning: No network requests and no file system calls are made by the library itself; these requests are made by the user of the software library.
Performance and Scalability: The library has been tested with extensive documents. Docxtemplater is quite fast. For a fairly complex 50-page document, it can generate 250 outputs of those documents in 44 seconds, which is about 180 ms per document.
Updates: A single command can update the modules:
npm install docxtemplater && npx -y update-docxtemplater && npm install
Using a github action, you can also auto update your modules.
Maintenance: Maintenance is provided as part of the product. Contact us with any bugs and we will try to fix them in a timely manner.
Documentation: The documentation for each module can be found here
Licensing and Costs: See pricing information / See license information
Support and Contact Options: Support is efficient: with the PRO version, the average response time is 48 hours, and with Enterprise, it is 24 hours. Via email, click on "Contact Us" at the bottom right of the screen to send us an email
References and Success Stories: See front page here
Future Development Plans: In the next few months, an API version of docxtemplater.
How can I run docxtemplater paid software ?
docxtemplater core and all docxtemplater paid modules are all written using javascript in a way that they can run both :
- on a server using Node.js
- in browsers
Platform Support
docxtemplater works on most modern platforms, and also some older ones. Here is a list of what is tested regularly:
- Node.js versions 10, 12, 14, 15, 16, 18, 20, 22 and all future versions (older versions will also work, but support has ended)
- Chrome version 58,71,73,100 and all future versions
- Firefox 55,60,66,100 and all future versions
- Safari 11,12
- IE10, IE11, Edge 16-18
- Android 4.2+
- iPads and iPhones v8.1, 10.3
List of reserved characters and module prefixes
When using the angular parser, the following characters are reserved for expressions :
+ - * / % === !== == != < > <= >= && || ! = | ( ) { } [ ] . , ; : ?
Also, modules use prefixes in order for docxtemplater to know which tag maps to which module.
This "prefix" matching is done as a first step, before using the "angular parser" option (or a custom parser you wrote).
Here is the list of prefixes together with their modules :
| Prefix | Example | Module |
|---|---|---|
# and / | {#loop}X{/loop} | Loop Module (part of open-source package) |
^ and / | {^loop}X{/loop} | Loop Module - inverted loop (part of open-source package) |
- and / | {-w:p loop}X{/loop} | Loop Module - dash syntax (part of open-source-package) |
@ | {@raw} | RawXmlModule (part of open-source-package) |
= | {=% %=} | Change Delimiter (part of open-source-package) |
$ | {$chart} | Chart Module |
% and %% | {%inline} {%%block} | Image Module |
~ | {~htmlInline} | Can be placed within a paragraph. HTML Module, HTML Pptx Module, HTML Xlsx Module |
~~ | {~~htmlBlock} | Must be only text in a paragraph. HTML Module, HTML Pptx Module, HTML Xlsx Module |
~~~ | {~~~htmlShape} | For pptx documents, it makes it possible to add tables. Only for HTML Pptx Module |
> | {>users}{name} | Xlsx module - Expand Horizontal feature |
:include | {:include doc} | Subtemplate Module and Pptx Subtemplate Module |
:segment and :segment/ | {:segment head} {:segment/} | Subtemplate Module |
:includesegment and :includesegment* | {:includesegment head} {:includesegment* var} | Subtemplate Module |
:subsection and :replacesection | {:subsection doc} {:replacesection doc} | Subsection Module |
? | {?text} | Paragraph placeholder Module |
:footnote | {:footnote data} | Footnote module |
: | {:users} | Slides module |
:stylecell | {:stylecell s1} | Styling module (Style a cell, eg background color) |
:stylepar | {:stylepar s2} | Styling module (Style a paragraph, eg text color of a paragraph) |
:stylerun | {:stylerun s3} | Styling module (Style a run, eg text color of some words that use the same style) |
::stylerun | {::stylerun s4} | Styling module Edit the rStyle of the run. (Will apply to all runs using that rStyle |
:stylebullets | {:stylebullets s5} | Styling module Edit the bullet style (bullet color) |
:stylerow | {:stylerow s6} | Styling module Applies to all cells of the current row |
:styleshape | {:styleshape s7} | Styling module Applies to the shape in which that paragraph is |
:table | {:table data} | Table module (Full table feature) |
:#1 | {:#1}, {:#2} | Table module (Grid table feature) |
:#xxx#1 | {:#users#1}, {:#users#2} | Table module (Grid table feature) |
:#grid and :/grid | {:#grid users}, {:/grid} | Table module (Grid table feature) |
:vt# and :vt/ | {:vt# users}, {:vt/ users} | Table module (Vertical Table loop) |
:merge-cells-col | {:merge-cells-col 1}, {:merge-cells-col rtl 4,3,2,1} | Table module (Mergecells feature) |
r@ | {r@raw} | Word Run module |
Understanding Line Breaks vs. Paragraph Breaks
Key Difference:
- Paragraph Break: Created by pressing "Enter" once
- Line Break: Created by pressing "Shift+Enter"
Important Note:
Several features in our system work only with paragraph breaks, not with line breaks.
Affected Features:
- Paragraph loop feature
- HTML block tag:
{~~html} - Image block tag:
{%%image} - Full table tag:
{:table table1} - Subtemplate module:
{:subtemplate doc}
Debugging Tool:
To identify why certain features might not be working, you can highlight all breaks from within the Word Ribbon:

This will show:
 for paragraph breaks (Enter)
 for line breaks (Shift+Enter)
Recommendation:
When using any of the above-mentioned features, ensure you're using paragraph breaks (Enter) instead of line breaks (Shift+Enter).
Docxtemplater's dependencies
Command line interface (CLI)
See the github repository of the command line interface.
To install the cli, use this command:
npm install -g docxtemplater-cli
The syntax is the following:
docxtemplater input.docx data.json output.docx
Avoiding huge space when using "justify" alignment with linebreaks
When having a tag that is in a justified paragraph, if you add a multiline string, the rendering of the characters will make them look way apart.
This can be fixed either by changing the template file, and go to :
File tab / Options command / Advanced option / Layout Options / turn on: "Don't Expand Character spaces on a line that ends with SHIFT-RETURN".
Then, after saving the file, this setting will be persisted in the file and the issue will be fixed for that file.
You can also, with the following code, automatically apply this setting to an existing file.
const fixShiftReturnModule = {
    name: "AddDoNotExpandShiftReturn",
    optionsTransformer(options, docxtemplater) {
        docxtemplater.fileTypeConfig.tagsXmlLexedArray.push(
            "w:compat",
            "w:settings",
            "w:doNotExpandShiftReturn"
        );
        return options;
    },
    preparse(xml, options) {
        const { filePath } = options;
        if (filePath === "word/settings.xml") {
            let addedDoNotExpandShiftReturn = false;
            const added = [];
            let addIndex = -1;
            xml.forEach(function (part, i) {
                if (part.tag === "w:doNotExpandShiftReturn") {
                    addedDoNotExpandShiftReturn = true;
                }
                if (part.tag === "w:compat") {
                    if (part.position === "end") {
                        added.push({
                            type: "tag",
                            value: "<w:doNotExpandShiftReturn />",
                            position: "selfclosing",
                            tag: "w:doNotExpandShiftReturn",
                        });
                        addIndex = i;
                        addedDoNotExpandShiftReturn = true;
                    }
                }
                if (part.tag === "w:settings") {
                    if (part.position === "end") {
                        if (!addedDoNotExpandShiftReturn) {
                            added.push(
                                {
                                    type: "tag",
                                    value: "<w:compat>",
                                    position: "start",
                                    tag: "w:compat",
                                },
                                {
                                    type: "tag",
                                    value: "<w:doNotExpandShiftReturn />",
                                    position: "selfclosing",
                                    tag: "w:doNotExpandShiftReturn",
                                },
                                {
                                    type: "tag",
                                    value: "</w:compat>",
                                    position: "end",
                                    tag: "w:compat",
                                }
                            );
                            addIndex = i;
                        }
                    }
                }
            });
            if (addIndex !== -1) {
                xml.splice(addIndex, 0, ...added);
            }
        }
        return xml;
    },
};

const doc = new Docxtemplater(zip, {
    linebreaks: true,
    paragraphLoop: true,
    modules: [fixShiftReturnModule],
});
doc.render({
    text: "Lorem ipsum dolor sit amet\n, consetetur sadipscing elitr\n, sed diam nonumy eirmod tempor invidunt ut labore et dolore magna aliquyam erat, sed diam voluptua. At vero eos et accusam et justo duo dolores et ea rebum. Stet clita kasd gubergren, no sea takimata sanctus est Lorem ipsum dolor sit amet.",
});
doc.toBuffer() is not a function / doc.toBlob() is not a function
If you get this message, you probably are using code from our latest examples, but are using docxtemplater <=3.61.2.
You need to upgrade to docxtemplater@3.62.0 to be able to use the toBuffer and toBlob methods on a Docxtemplater instance.
Installing behind a corporate proxy
If you try to install one of the paid package behind a proxy, you might see the following error :
npm http GET https://registry.npmjs.org/yo
npm http GET https://registry.npmjs.org/yo
npm ERR! network read ECONNRESET
npm ERR! network This is most likely not a problem with npm itself
npm ERR! network and is related to network connectivity.
npm ERR! network In most cases you are behind a proxy or have bad network settin
gs.
npm ERR! network
npm ERR! network If you are behind a proxy, please make sure that the
npm ERR! network 'proxy' config is set properly. See: 'npm help config'
npm ERR! System Windows_NT 6.2.9200
npm ERR! command "C:\\Program Files\\nodejs\\\\node.exe" "C:\\Program Files\\nod
ejs\\node_modules\\npm\\bin\\npm-cli.js" "install" "-g" "yo"
npm ERR! cwd C:\Windows\system32
npm ERR! node -v v20.16.0
npm ERR! npm -v 10.8.1
npm ERR! syscall read
npm ERR! code ECONNRESET
npm ERR! errno ECONNRESET
npm ERR!
npm ERR! Additional logging details can be found in:
npm ERR! C:\Windows\system32\npm-debug.log
npm ERR! not ok code 0
In this case, you need to configure your npm proxy :
To configure a proxy for npm, you use the npm config set command. The specific command to set up a proxy is:
npm config set proxy http://proxy-server-url:port
For HTTPS proxies, you would use:
npm config set https-proxy https://proxy-server-url:port
Replace "proxy-server-url" with the actual URL of the proxy server, and "port" with the appropriate port number.
If the proxy requires authentication, you can include the credentials in the URL like this:
npm config set proxy http://username:password@proxy-server-url:port
To verify the proxy settings, users can run:
npm config get proxy
npm config get https-proxy
If users need to remove the proxy settings later, they can use:
npm config delete proxy
npm config delete https-proxy
On some Windows environments, you might also need to use the Windows command prompt or PowerShell to set system environment variables. Here's the process:
Open Command Prompt or PowerShell as an administrator.
Set the
HTTP_PROXYandHTTPS_PROXYenvironment variables using thesetxcommand:
For HTTP proxy:
setx HTTP_PROXY "http://proxy-server-url:port"
For HTTPS proxy:
setx HTTPS_PROXY "http://proxy-server-url:port"
Replace "proxy-server-url:port" with your actual proxy server address and port.
- If your proxy requires authentication, include the username and password:
setx HTTP_PROXY "http://username:password@proxy-server-url:port"
setx HTTPS_PROXY "http://username:password@proxy-server-url:port"
- After setting these variables, you'll need to close and reopen your command prompt or restart your computer for the changes to take effect.
This method sets the proxy for the entire system, which npm will then use. It's particularly useful in corporate environments where a system-wide proxy is required.
Why I advise against writing a similar library from scratch
Building a first robust version of docxtemplater took us four years. Here is the main reason why creating this library was challenging:
DOCX is a zipped format containing XML files. Creating a simple templating system to replace {tags} with their values is difficult because the text "{tag}" is most of the time split across multiple XML tags:
<w:t>{</w:t>
<w:t>tag</w:t>
<w:t>}</w:t>
This splitting of tags into multiple XML elements adds a lot of complexity to the problem, and finding a correct solution took us many iterations before settling for a solution.
We had to rewrite much of the parsing engine between version 2 and version 3 of docxtemplater to make the open-source code more extensible: See the migration here
Write a parser to get nested properties access : {user.name}
You can write the code below if you want to be able to write {user.name} in your template to get a nested property in your JSON.
This can also be achieved using the angular-parser feature, which also has some other features such as filters that use the | character. The sample below is if you want to have a simple to understand parser that just handles nested properties.
const doc = new Docxtemplater(zip, {
    paragraphLoop: true,
    linebreaks: true,
    parser(tag) {
        const splitted = tag.split(".");
        return {
            get(scope) {
                if (tag === ".") {
                    return scope;
                }
                let s = scope;
                for (
                    let i = 0, len = splitted.length;
                    i < len;
                    i++
                ) {
                    const key = splitted[i];
                    s = s[key];
                }
                return s;
            },
        };
    },
});
doc.render({
    user: {
        name: "John",
    },
});
Font family incorrect after converting docx to pdf
If you are converting your docx files to pdf automatically, and the output PDF has not the correct font family, it could be due to several reasons :
- The font in the output docx may not be embedded into the document : you can embed it by changing the file options
- The font may not installed on the system performing the conversion
- The conversion software doesn't properly support the specific font family (could happen when using libreoffice)
- Another bug in your converter or in your pdf preview application
How is docxtemplater tested ?
There are many types of tests done in docxtemplater
- Integration tests, that are tests where we take a real .docx document, some JSON data, render the document and then verify that it the same as the expected document (this can be seen as snapshot testing)
- Regression tests, that are tests where we take real or fake docx to ensure that bugfixes that have been found can't occur in the future
- Unit tests, that help understand the internals of docxtemplater, and allows to verify that the internal data structures of the parsed template are correct
- Speed tests, that help to optimize the speed of docxtemplater
Integration tests
The integration tests are in es6/tests/integration.js
it("should work with table pptx", function () {
    const doc = createDoc("table-example.pptx");
    doc.render({
        users: [
            { msg: "hello", name: "mary" },
            { msg: "hello", name: "john" },
        ],
    });
    shouldBeSame({
        doc,
        expectedName: "expected-table-example.pptx",
    });
});
All of the test documents are in the folder examples/
- We first load a document from table-example.pptx
- We then set data and render the document.
- We then verify that the document is the same as "expected-table-example.pptx"
shouldBeSame will, for each XML file that is inside the zip document, pretty print it, and then compare them. That way, we have a more beautiful diff and spacing differences do not matter in the output document.
Regression tests
There are many regression tests, ie tests that are there to ensure that bugs that occured once will not appear again in the future.
A good example of such a test is here
Docxtemplater was not able to render text that was written in russian (because of an issue with encoding).
it("should insert russian characters", function () {
    const russian = "Пупкина";
    const doc = createDoc("input.docx");
    const zip = new PizZip(doc.loadedContent);
    const d = new Docxtemplater(zip);
    d.render({ last_name: russian });
    const outputText = d.getFullText();
    expect(outputText.substr(0, 7)).to.be.equal(russian);
});
This test ensures that the output of the document is correct.
Every time we correct a bug, we should also add a regression test to make sure that bug cannot appear in the future.
Unit tests
The input/output for the unit tests can be found in es6/tests/fixtures.js:
For example
test({
    it: "should handle {user} with tag",
    content: "<w:t>Hi {user}</w:t>",
    scope: {
        user: "Foo",
    },
    result: '<w:t xml:space="preserve">Hi Foo</w:t>',
    lexed: [
        {
            type: "tag",
            position: "start",
            value: "<w:t>",
            text: true,
        },
        {
            type: "content",
            value: "Hi ",
            position: "insidetag",
        },
        { type: "delimiter", position: "start" },
        {
            type: "content",
            value: "user",
            position: "insidetag",
        },
        { type: "delimiter", position: "end" },
        {
            type: "tag",
            value: "</w:t>",
            text: true,
            position: "end",
        },
    ],
    parsed: [
        {
            type: "tag",
            position: "start",
            value: "<w:t>",
            text: true,
        },
        {
            type: "content",
            value: "Hi ",
            position: "insidetag",
        },
        { type: "placeholder", value: "user" },
        {
            type: "tag",
            value: "</w:t>",
            text: true,
            position: "end",
        },
    ],
    postparsed: [
        {
            type: "tag",
            position: "start",
            value: '<w:t xml:space="preserve">',
            text: true,
        },
        {
            type: "content",
            value: "Hi ",
            position: "insidetag",
        },
        { type: "placeholder", value: "user" },
        {
            type: "tag",
            value: "</w:t>",
            text: true,
            position: "end",
        },
    ],
});
There you can see what the different steps of docxtemplater are, lex, parse, postparse.
Speed tests
To ensure that there is no regression on the speed of docxtemplater, we test the performance by generating multiple documents and we expect that the time to generate these documents should be less than for example 100ms.
These tests can be found in es6/tests/speed.js
For example for this test:
it("should be fast for loop tags", function () {
    const content = "<w:t>{#users}{name}{/users}</w:t>";
    const users = [];
    for (let i = 1; i <= 1000; i++) {
        users.push({ name: "foo" });
    }
    const time = new Date();
    createXmlTemplaterDocx(content, {
        tags: { users },
    }).render();
    const duration = new Date() - time;
    expect(duration).to.be.below(60);
});
Here we verify that rendering a loop of 1000 items takes less than 60ms. This happens to also be a regression test, because there was a problem when generating documents with loops (the loops became very slow for more than 500 items), and we now ensure that such regressions will not appear again.
List of third party libraries (list of dependencies)
One of the main third-party library that we recommend and is optional is the angular-expressions library.
Here is a list of third party libraries for each modules :
chart
- color-js@1.0.5
- lodash@4.17.21
error-location
- lodash@4.17.21
footnote
- lodash@4.17.21
html
- @adobe/css-tools@4.4.2
- color-js@1.0.5
- css-what@6.1.0
- domhandler@5.0.3
- he@1.2.0
- htmlparser2@10.0.0
- image-size@1.2.1
- lodash@4.17.21
- specificity@1.0.0
html-pptx
- @adobe/css-tools@4.4.2
- color-js@1.0.5
- css-what@6.1.0
- css@3.0.0
- domhandler@5.0.3
- he@1.2.0
- htmlparser2@10.0.0
- lodash@4.17.21
- specificity@1.0.0
html-xlsx
- @adobe/css-tools@4.4.2
- color-js@1.0.5
- css-what@6.1.0
- css@3.0.0
- domhandler@5.0.3
- he@1.2.0
- htmlparser2@10.0.0
- lodash@4.17.21
- specificity@1.0.0
image
- jimp@1.6.0
- lodash@4.17.21
meta
- lodash@4.17.21
paragraph-placeholder
- lodash@4.17.21
- pizzip@3.1.8
pptx-sub
- lodash@4.17.21
qrcode
- @jimp/custom@0.22.12
- @jimp/types@0.22.12
- jsqr@1.4.0
- lodash@4.17.21
slides
- lodash@4.17.21
style
- lodash@4.17.21
subsection
- lodash@4.17.21
subtemplate
- lodash@4.17.21
table
- lodash@4.17.21
wrun
No dependencies
xlsx
- lodash@4.17.21
docker-version
(It also uses all dependencies of all modules)
- angular-expressions@1.4.3
- bluebird@3.7.2
- body-parser@1.20.3
- docxtemplater@3.63.0
- express@4.21.2
- file-type@20.1.0
- hasha@5.2.2
- he@1.2.0
- image-size@1.2.0
- lodash@4.17.21
- mkdirp@3.0.1
- multer@1.4.5-lts.1
- pizzip@3.1.7
- uuid@9.0.1